

Mario Odyssey Prize In The Party Room
Welcome to our ultimate guide for collecting every Power Moon from the Sand Kingdom in Super Mario Odyssey! Below, you lot'll find maps detailing the verbal location for all 89 of the Power Moons located in this Kingdom, as well equally descriptions on how to get each and every one of them.
The numbers on the maps correspond to the relevant Ability Moon listed below and, whilst almost of them announced in that spot from the commencement (or after y'all've completed the story at least), information technology is worth null that sometimes you are required to perform a specific action to make it appear. Employ a combination of our maps and walkthrough information to grab each of the Power Moons with ease. Savor!
Sand Kingdom Power Moons (ane-25)
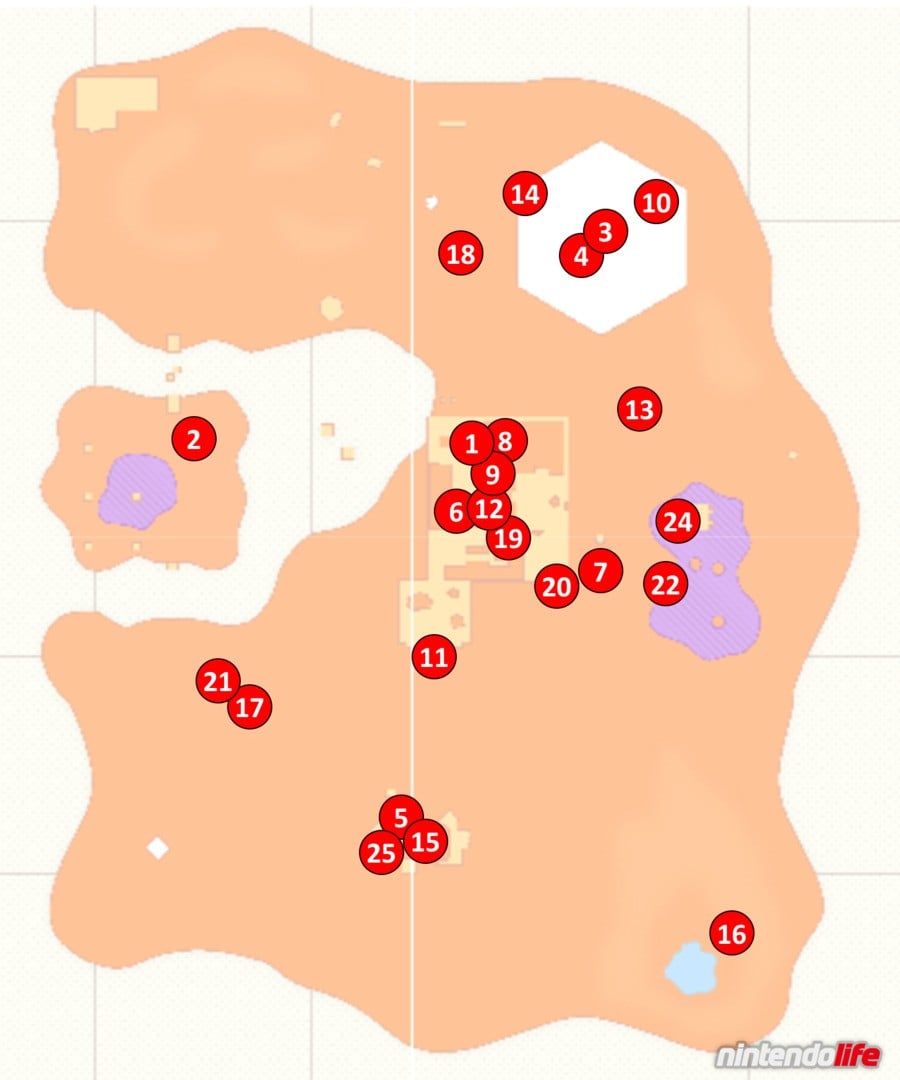
one. Atop the Highest Tower: This is your first task when you initially arrive at the Sand Kingdom. Keep climbing the tower as indicated by the game to find this Power Moon waiting for yous on height.
two. Moon Shards in the Sand: Another required Power Moon, this time effectually you need to collect five Moon Shards. They are all scattered around the poison lake apart from one which is on height of a pillar. Capture a nearby Moe-Eye (the stones with sunglasses) and employ its ability to run into a path appear from the pillars above you lot - y'all'll and so be able to collect the terminal shard.
3. Showdown on the Inverted Pyramid: You'll receive a Multi Moon for defeating Harriet of the Broodals on top of the Inverted Pyramid.
4. The Hole in the Desert: In one case you've defeated the Broodal, a pigsty will open in the ground below the Inverted Pyramid. Enter this hole and make your manner through until you reach some other boss battle. Win here and you'll receive yet another Multi Moon.
5. Overlooking the Desert Boondocks: This Power Moon is sitting inside a bell belfry at location number 5 on our map. Simply leap up to the pinnacle and collect it.
six. Alcove in the Ruins: In the ruins you'll encounter a big slide of sand that Mario cannot jump through. Caput towards the slide only look to the correct to find a small alcove with a Power Moon within.
7. On the Leaning Pillar: On the mainland of the ruins near location number 7 on our map, yous will notice a couple of Bullet Bills being fired towards yous. Capture one, and then direct it over to this leaning pillar to collect the Power Moon.
viii. Hidden Room in the Flowing Sands: Head towards location number 8 on our map and jump into the big square patch of quicksand. On the western wall you'll see a slight gap where the building meets the sand. Head to that point and let Mario sink until his head is but under this gap. Then push your left control stick forrad and proceed jumping frantically to make Mario attain a secret room underneath the sand. Inside, you'll find a Power Moon.
nine. Secret of the Landscape: Head within the second Mario section that circles the tower. Only before y'all leave at the top, leap back down onto the moving platform equally information technology touches the left wall. If you walk into this wall y'all'll find a tiny hidden area with a Power Moon.
10. Secret of the Inverted Mural: In the second Mario section on the Inverted Pyramid, you'll eventually come to a part where you can see ii greenish pipes. Get by these pipes and bound through a crack in the wall to find a hidden Ability Moon.
11. On Top of the Rock Archway: By using ane of the ability lines from the small-scale town area nigh the Odyssey, y'all will be able to aught right over a Power Moon that is sitting on an otherwise impossible to achieve archway. Jump off the zip wire at but the right fourth dimension to catch it.
12. From a Crate in the Ruins: When you accomplish the superlative of the showtime 2D Mario landscape, you lot'll see some crates nearby. Smash the glowing crate to reveal a Power Moon, and so apply a Bullet Bill to fly over to its new location.
13. On the Lone Pillar: From the Tostrena Ruins Round Belfry checkpoint, capture Glydon (the flying dragon-lizard-thingy) and glide towards location 13 on our map. Yous'll be able to achieve a colonnade with a Ability Moon sitting right on top.
14. On the Statue's Tail: On top of the Inverted Pyramid, you'll notice that one of the Jaxi Statues' tail is glowing. Hold down the 'Y' button to throw Cappy at the tail and, after a short time, a Ability Moon will popular correct out.
fifteen. Hang Your Hat on the Fountain: Detect the fountain in the master, small town surface area nigh the Odyssey. Concur downwardly the 'Y' button to throw Cappy at the golden role at the top and a Power Moon will somewhen come out.
xvi. Where the Birds Get together: Head to location number 16 on our map (near the Oasis) and you lot'll see a small grouping of birds sitting on a small lump in the sand. Basis pound this spot to uncover a Power Moon.
17. Top of a Dune: Head to location number 17 on our map to detect the tallest dune in the Kingdom. Brand your style to the top of this dune and use the HD Rumble in your controller(s) to feel a Ability Moon hugger-mugger. When yous're on the strongest spot, ground pound!
18. Lost in the Luggage: If you head to location number 18 on our map, you should be able to find a glowing spot in the sound that will reward you with a Power Moon if you basis pound information technology. Depending on how far through the Kingdom you have progressed, it volition either exist near a taxi frozen in the ice, or a couple of machine tires and boxes.
19. Bullet Pecker Breakthrough: Capture the offset Bullet Bill in the ruins and use information technology to wing through the hole in the wall just behind it. Doing this will let you to use the Bullet Bill to blast the giant cage inside, freeing a Power Moon.
20. Inside a Block Is a Hard Place: Head to the Tostarena Ruins Sand Pillar checkpoint and jump down to the area below. On the far side of this little expanse you'll come across a glowing block - but use the nearby Bullet Nib to smash it open and collect the Power Moon inside.
21. Bird Traveling the Desert: If y'all look out for it, you lot should notice a bird flight around the bottom half of the Kingdom and, if you tin can touch information technology, you lot will receive a Power Moon. We managed to make contact at location number 21 on our map only it travels between this spot and the oasis on the eastern side of the Kingdom.
22. Bird Traveling the Wastes: A 2d bird can be found flying around the toxicant lake on the eastern side of the Kingdom. Again, merely make contact with the bird to receive a Power Moon.
23. The Lurker Under the Stone (see location 3) : Head back to the top of the Inverted Pyramid and you lot'll notice a bump in the basis that keeps moving around. Use Cappy to stun the bump and then footing pound information technology when it's yet to reveal a Power Moon.
24. The Treasure of Jaxi Ruins: Head through the entire Ice Cave (located past inbound the whirlpool-like surface area of quicksand in the ruins) until you accomplish the exit. You'll emerge on a small-scale platform that has 2 chests on information technology - utilize Cappy to open the 1 on the left to reveal a Ability Moon.
25. Desert Gardening: Plaza Seed: Underneath where Talkatoo is perching in the primary area of town, you'll see iii plant pots. If you throw the seed that can be found correct in front of them into one of these pots, it will slowly start to abound. When it reaches full height, you lot'll exist able to throw Cappy at it to receive a Power Moon.
Sand Kingdom Power Moons (26-50)
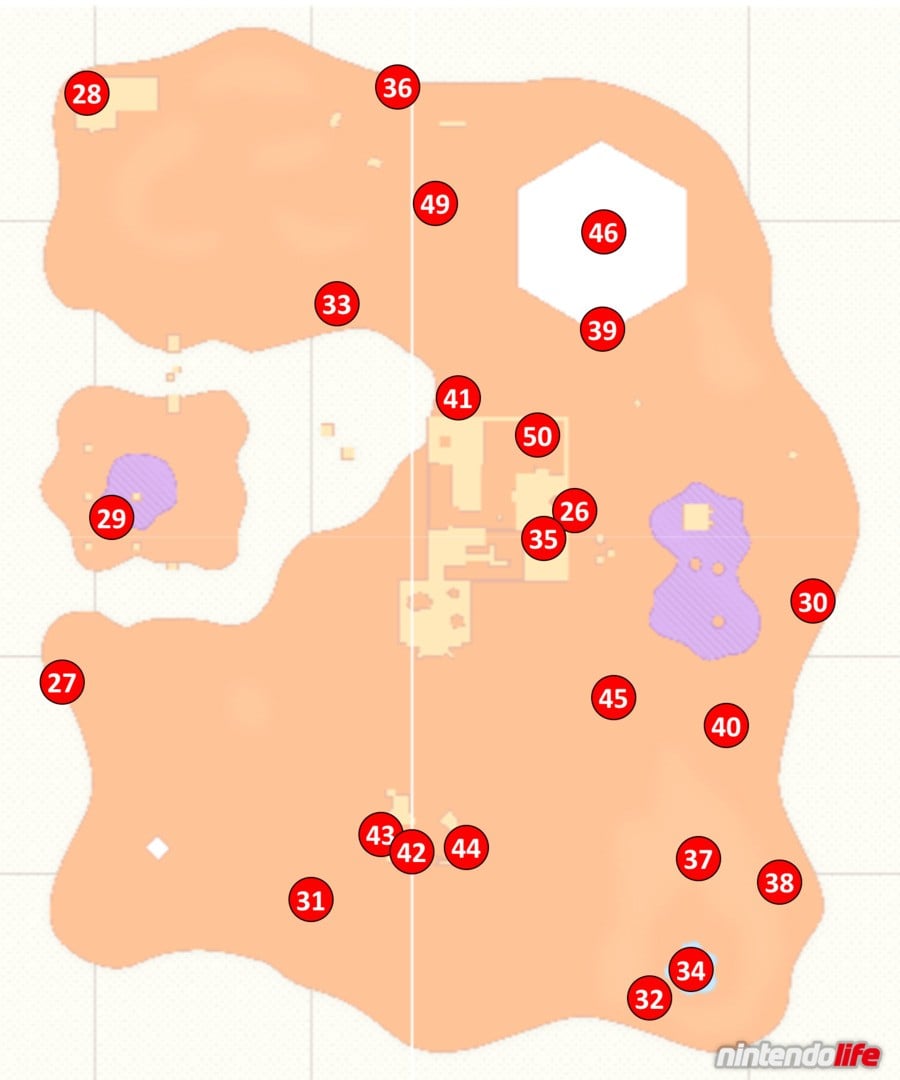
26. Desert Gardening: Ruins Seed: If you haven't already encountered the institute pots, make sure to read our description for Power Moon number 25 to a higher place first. At present head to location number 26 to find the second seed - information technology is located in a small alcove on the outside of the eastern wall of the ruins. Bring the seed back to echo the process and eventually collect a Power Moon.
27. Desert Gardening: Seed on the Cliff: If you haven't already encountered the plant pots, make sure to read our description for Power Moon number 25 higher up beginning. Now caput to location number 27 to find the 3rd and terminal seed - you'll demand to drib downwards onto a small ledge on the side of the cliff to find it.
28. Sand Kingdom Timer Claiming one: Head to the ruins at the furthest northwest indicate on the map and throw Cappy at the scarecrow sitting on the roof. Use a combination of rolls and wall jumps to make your fashion to the Moon before the timer runs out.
29. Sand Kingdom Timer Challenge two: In the southwest corner of the poison lake well-nigh the Moe-Eyes, you lot should be able to spot a P Switch. Step on it with a Moe-Eye and use its sight ability to run across a new path extend over the poison. Catch the key - and then the Power Moon - before the time runs out by switching the sunglasses on and off as and when y'all need them.
30. Sand Kingdom Timer Challenge iii: Y'all'll find another scarecrow at location thirty on our map. Throw Cappy at it to make blocks announced over the poison. Y'all tin either try to run and jump your way across these within the time limit or, if that'south a little too hard, you can use a Jaxi to run over the toxicant instead.
31. Found in the Sand! Good Dog!: You'll find a dog continuing only in front of the main town area near the Odyssey and, if you stand near him for a short while, he'll atomic number 82 you to a spot in the ground. Later on he has uncovered a glowing spot, utilise a ground pound to reveal a Power Moon.
32. Taking Notes: Leap on the Palm: Caput to the oasis area in the southeast role of the map and wait for a large treble clef on top of one of the palm copse. Touch it, and so collect the notes that appear on top of the trees, to collect your Power Moon.
33. Herding Sheep in the Dunes: At location number 33 on our map, you'll find a local resident sitting inside a circle of stone. He'll tell y'all that he has lost three sheep - you need to go these sheep dorsum into that circle to receive the Power Moon. They are all located close past in the northern section of the map - simply throw Cappy at them from behind to send them flight in the direction you lot desire them to become.
34. Fishing in the Oasis: Head to the oasis surface area (in the southeast) and capture the Lakitu hovering by the h2o. Use his angling ability to lure out the largest shadow from the water to reveal a Cheep Cheep who will reward you with a Ability Moon.
35. Dearest in the Heart of the Desert: Y'all'll find a Goombette at location 35 on our map (in the ruins section near the Bullet Bills). You lot can either build a tower of Goombas by capturing i and and then jumping on others - taking this over to the Goombette when you lot're alpine enough to make eye contact with her, or you tin can capture one Goomba and take it over to the spinning bloom near the second Bullet Nib. Use 'ZL' to release the Goomba temporarily, hitting the blossom with Cappy, and then recapture the Goomba and fly upward to the ledge with the Goombette. She'll give yous a Power Moon for your troubles.
36. Amid the 5 Cactuses: Grab yourself a Jaxi, and and then head right upwardly to location number 36 on our map (correct at the height in the centre). You'll find a row of cacti and, by smashing the tall center 1, you'll reveal a Power Moon.
37. You're Quite a Grab, Captain Toad!: Start by capturing the Lakitu by the oasis in the southeast corner of the map. Fly north until you reach an expanse with three cacti and a noticeboard. Bandage your line into the sand to attract the largest silhouette you can run across - information technology turns out to be Captain Toad! He'll give you a Power Moon equally a thanks for rescuing him.
38. Jaxi Reunion!: Just northeast of the oasis you'll find a statue of a Jaxi with an empty spot for another statue to be placed. Have a living Jaxi over to that spot to exist rewarded with a Power Moon.
39. Welcome Back, Jaxi!: Head to the top of the Inverted Pyramid and call a Jaxi using the 'Jaxi-stop'. Ride the Jaxi over to the merely corner of the Pyramid that doesn't take a statue on information technology to reveal a Power Moon.
40. Wandering Cactus: At location 40 on our map (only below the eastern poisonous substance lake) yous'll observe a cactus with a green button on its top. Capture the cactus and move it away from its original standing infinite to find a glowing spot in the sand - basis pound this to reveal a Power Moon.
41. Sand Quiz: Wonderful!: This Power Moon will only be available to you lot if you accept already obtained Power Moon number 51. If you have already spoken to the Sphynx once, do so again to exist quizzed for a second time. If you need help with the answers to its questions, they are: thirty, Ice, 5, and Sphynx.
42. Shopping in Tostarena: Simply caput to this Kingdom's Crazy Cap shop and purchase this Power Moon for 100 Gold Coins.
43. Employees Only: Just backside the Crazy Cap store is a small grate that has been disrepair open up with a few coins inside. Hunker to enter this little hidden passageway and follow it through until you end up behind the counter of the store. The Power Moon is waiting for yous right there.
44. Sand Kingdom Slots: For this Power Moon, simply head to the edifice offering a game of slots in the master town area and talk to the assistant. Y'all'll need to throw Cappy at the spinning icons to make them all terminate on the Ability Moon.
45. Walking the Desert!: This one tin can exist a piffling catchy. Caput to location 45 on our map to find a Koopa wearing a sombrero. He'll ask you to take part in a walking challenge and, if you can complete it, he'll reward you with a Power Moon. Our best advice for the challenge is to pay attending to the circle when it showtime appears and accept annotation of where it lies in relation to the cacti and bushes surrounding it. Employ those every bit a reference point when yous walk around.
46. Subconscious Room in the Inverted Pyramid: Inside the Inverted Pyramid, you'll somewhen enter a room where you need to utilize a Bullet Bill to fly through pillars that are on a sort of conveyor chugalug going from right to left. When you reach this room, capture a Bullet Bill and use 'ZL' to jump out of information technology at but the correct time to land on the conveyor belt (in between your option of pillars). You'll become taken through the left wall with the pillars and find yourself in a hidden room containing a Power Moon!
47. Underground Treasure Chest (see location 46): Enter the giant hole beneath the Inverted Pyramid and make your style through the majority of its rooms. Eventually you'll accomplish an surface area where you need to fly a Bullet Pecker past some pillars to a patch of ice, and so a 2nd Bullet Bill to the go out. Instead of flying the kickoff ane to the patch of ice, take it around the right hand side of the structure to achieve some hidden steps. Use the spinning bloom to get on top of the construction and make your way along the thin path to attain a platform with a treasure chest on peak - there is a Power Moon waiting inside.
48. Goomba Tower Assembly (see location 46): Within the giant hole underneath the Inverted Pyramid, you'll notice a large tower of Goombas waddling around ane of the earlier sections. Capture this tower and collect more Goombas by jumping on them until y'all tin jump to reach the Power Moon that is floating in the air nearby.
49. Under the Mummy's Curse: Head to location number 49 on our map and spring down into the pigsty in the ground (you can't miss it). Inside this room, continue defeating the enemies that environs yous until a Power Moon pops out.
50. Ice Cave Treasure: Jump into the large whirlpool-similar bit of quicksand in the ruins and make you way through the bulk of the Ice Cave below. The final set of pillars (merely before the green pipe at the stop) have another set up of pillars hovering above them in the air. Wall bound between two of the pillars when they touch the ground, timing it simply right to continue your wall jumping upwardly onto the second ready of pillars above them. When you're on the elevation, jump across the pillars to collect the Power Moon hovering at the end.
Sand Kingdom Power Moons (51-69)
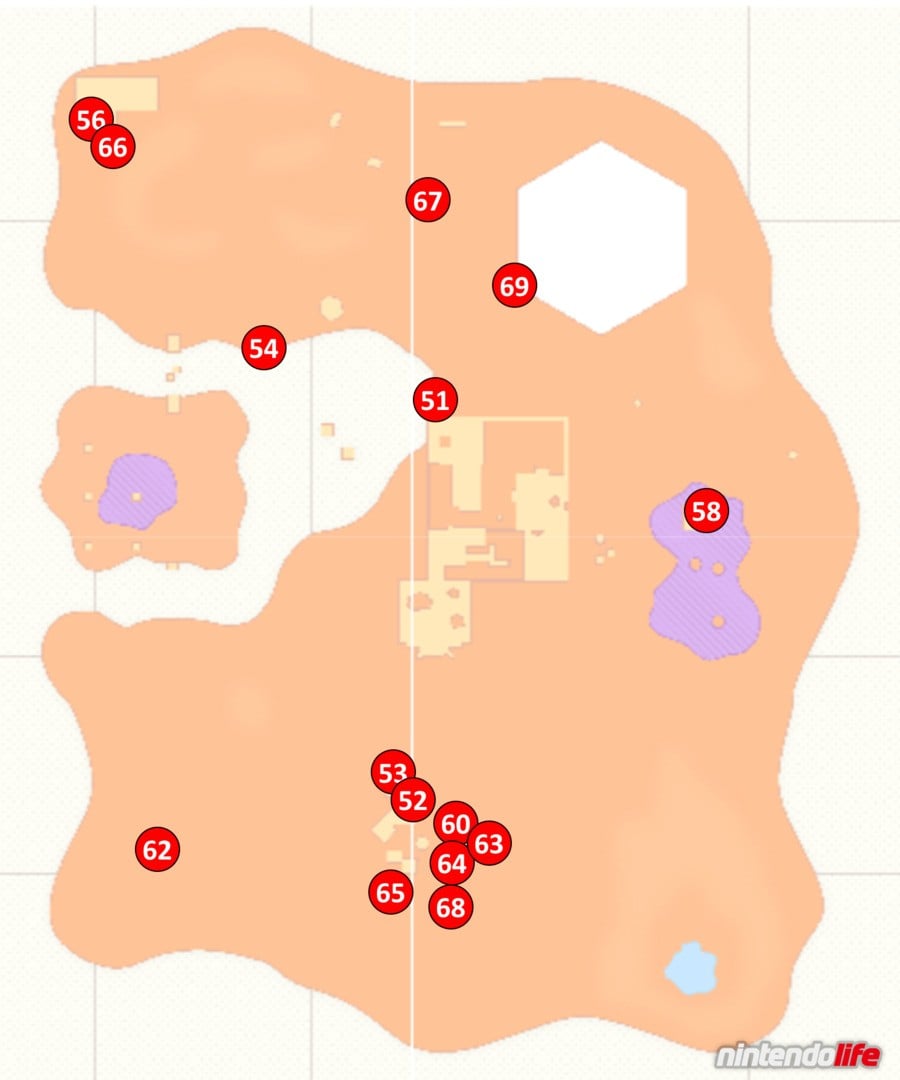
51. Sphynx's Treasure Vault: On the northwest edge of the ruins you lot'll find a huge Sphynx. The Sphynx will ask you lot a question - get it right (by answering with 'Coin') - and you lot'll receive a Ability Moon.
52. A Rumble from the Sandy Floor: In the main town expanse near the Odyssey, you lot'll observe a green pipe not far away from Talkatoo. Enter the pipe and use the Hard disk drive Rumble of your controller(south) inside to locate the Power Moon underground - a footing pound on the correct spot will brand it appear.
53. Dancing with New Friends: On the northwest edge of boondocks there is dorsum door entrance guarded by a resident in a sombrero. To enter, you must exist wearing the Sombrero and Poncho habiliment items from this region's Crazy Cap shop. Simply stand on the big circle inside to claim your Power Moon.
54. The Invisible Maze: Head to location number 54 to find a red hat door (you'll notice a cavalcade of coins showing you the way down from the cliff'southward edge). Utilize the Moe-Eyes in memorise each flooring pattern and reach the end to get the Ability Moon.
55. Skull Sign in the Transparent Maze (come across location 54): In the aforementioned subconscious expanse as Power Moon number 54, you'll find a signpost with a skull on it in the starting time room. Throw Cappy at information technology for a while by holding down the 'Y' push button and a Power Moon will eventually popular out.
56. The Bullet Bill Maze: Break Through!: On the front wall of the ruins in the northwest region of the map you'll see a red door. Become within and use the Bullet Bills to travel to the terminate of the maze - a Power Moon will be waiting for you.
57. The Bullet Bill Maze: Side Path (run across location 56): In the same maze room as Ability Moon number 56, you'll notice a separate path that leads off to the left merely earlier you accomplish the first set up of rotating walls. Replace your Bullet Bill nearby and fly all the fashion effectually this alternative path to observe some other Ability Moon.
58. Jaxi Driver: Capture a Jaxi and head to location number 58 on our map to notice an entrance that goes nether the poisonous substance lake (if you can warp to the Jaxi Ruins checkpoint that would exist platonic). When yous're inside the cloak-and-dagger room, use your Jaxi to reach the end and take hold of the Power Moon waiting for you.
59. Jaxi Stunt Driving (come across location 58): In the same room as Power Moon number 58, use your Jaxi to touch the large treble clef in the central area. Yous'll need to touch all of the music notes that appear by charging downwardly one side of them, braking heavily, and returning the other way. A Power Moon is yours if yous can manage it.
60. Strange Neighborhood: In the middle of the town area near the Odyssey, a rocket is sitting on top of one of the buildings. Capture that rocket and employ it to fly to a secret area - attain the terminate of this area to collect a Power Moon.
61. In a higher place a Strange Neighborhood (see location 60): In the same secret area as Power Moon 60, progress through the course until you lot see a small tower of three Goombas and a platform to the correct with three blocks hovering in the air. Spring on top of the middle block and then jump up again to reveal a hidden block - jumping on this new block will allow you to reach a 2nd Power Moon hovering but to a higher place yous.
62. Hush-hush Path to Tostarena!: As 'Secret Path' Ability Moons often are, this one is pretty complicated. To get this Moon, yous volition need to apply a warp painting from a different earth - but at that place's a grab. The warp painting y'all need will be in one of ii places - either Lake Kingdom, or Wooded Kingdom - and this volition depend on which of these you decided to travel to kickoff on your initial play-through. Yous demand to head to the Kingdom you lot visited beginning.
If you lot went to Lake Kingdom start, head there and travel to the Courtyard checkpoint flag. Right next to the flag is a minor pool and if yous closely at the deep stop, y'all'll discover a warp painting down below. Swoop down and enter the painting to warp dorsum to the Sand Kingdom and grab your Power Moon.
If you lot went to Wooded Kingdom first, caput to the Forest Charging Station checkpoint and throw Cappy at the scarecrow in one of the charging machines. Spring up quickly onto the platforms that appear, making information technology all the manner to the meridian, and and so apply a backflip to leap from the meridian platform onto the scenery to a higher place. Walk over to the right and yous'll see a block with the warp painting fastened to 1 side - head inside and warp to the Sand Kingdom for your Power Moon.
63. Constitute with Sand Kingdom Art: In the east side of the town expanse near the Odyssey, you'll discover some hint art that resembles Bowser's Kingdom. To get this Moon, yous'll demand to wing to Bowser's Kingdom and warp to the Souvenir Shop checkpoint. From the flag, walk beyond 3 stones and ground pound that one to reveal a Power Moon.
64. Jammin' in the Sand Kingdom: In the boondocks area located near the Odyssey, you lot'll find a Toad wearing some headphones on top of one of the buildings. Play him the track 'Broodals Boxing' and he'll give you a Power Moon.
65. Hat-and-Seek: In the Sand: Just before you enter the town surface area (from the Odyssey's location) y'all'll detect a resident of the Cap Kingdom nearby - talking to him reveals that he'south lost a friend. Now walk over to the group of characters continuing in forepart of a small-scale regal building and talk to the one who is wearing a sombrero with eyes like Cappy to receive a Power Moon.
66. Sand Kingdom Regular Cup: Head to the ruins in the northwest corner of the map to detect a Koopa continuing adjacent to a leaderboard. Talk to him and defeat him in a race to collect a Power Moon. The race is easy to win - just bound onto the Jaxi just to the left of your starting position and employ him to accuse towards the goal.
67. Bounden Band Returned: Head to location 67 on our map to find a hole that volition have y'all underground. Ignore the Chinchos (mummy-type things) in front end of you and jump into the slingshot which volition burn you over to the giant Bounden Ring. Exercise a basis pound on top of the diamond to receive a Ability Moon.
68. Circular-the-Globe Tourist: This one takes a bit of time just it will net you lot several Power Moons forth the way. Yous'll kickoff need to talk to the Tostarenan standing next to the taxi but in front end of the town area. He'll tell yous well-nigh where he wants to visit in his taxi and you must go along travelling from Kingdom to Kingdom - finding him in his new location. If you need some help, he travels to the following Kingdoms: Metro, Cascade, Tiffin, Moon and Mushroom, earlier eventually returning to the Sand Kingdom which allows you to collect this Moon.
69. Peach in the Sand Kingdom: Head to the summit of the Inverted Pyramid and run to the corner indicated by number 69 on our map above. Yous'll find Peach continuing there and she'll give you lot a Power Moon if yous talk to her.
Sand Kingdom 'Moon Rock' Power Moons (seventy-89)
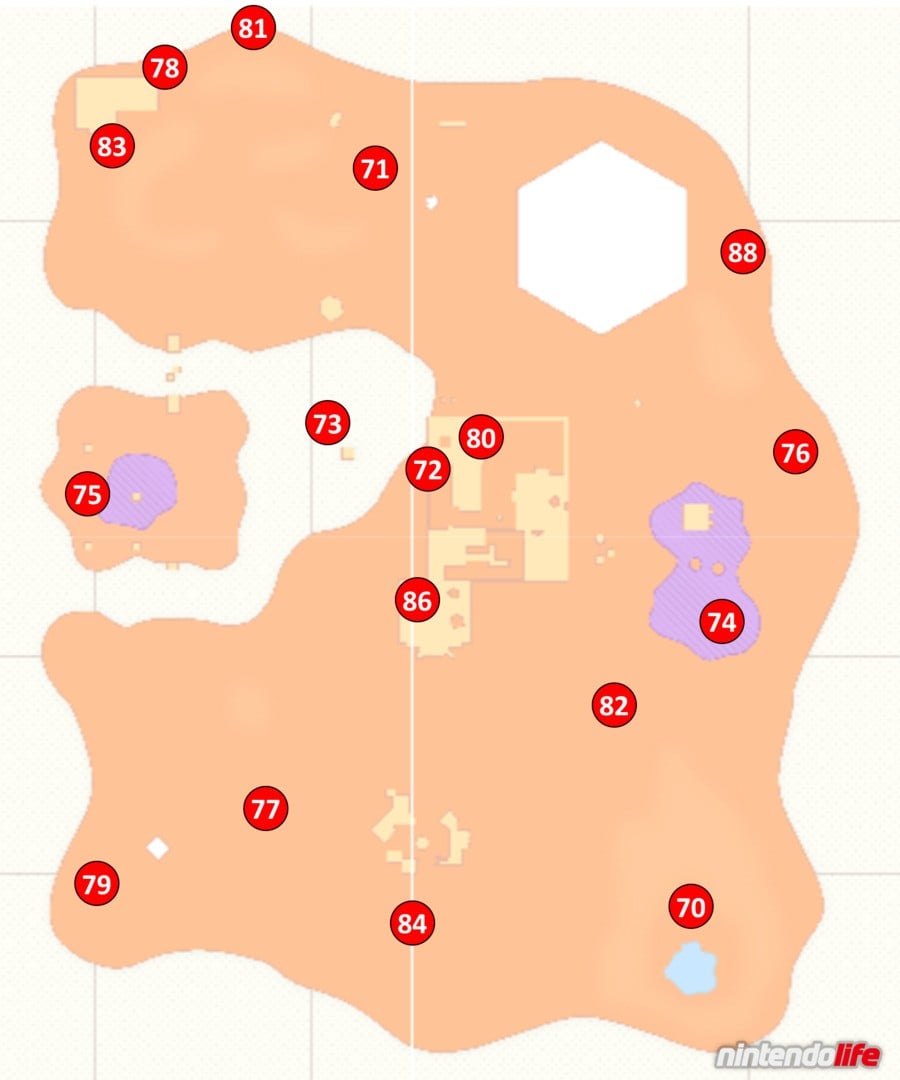
These Ability Moons will become bachelor to you when y'all accept smashed the Moon Rock located in this Kingdom.
70. Mighty Jump from the Palm Tree!: In the oasis area in the southeast corner of the map, climb the palm tree but behind the checkpoint flag to find a Power Moon sitting above it. Perform a backflip to make contact with it.
71. On the North Pillar: For this Ability Moon, yous need to kickoff past zipping along the electrical wire that connects the Inverted Pyramid to the ruins in the northwest corner of the map (you can beginning at either location). As you travel forth the wire, you lot'll notice a Ability Moon located on a pillar below y'all - bound off the wire with 'ZL' at but the correct fourth dimension to country on the colonnade and collect your Moon.
72. Into the Flowing Sands: In the ruins - at location 72 on our map - yous'll notice a Ability Moon sitting in plain sight on the large slide of quicksand. Stand on any piece of land above this Ability Moon and jump downward to make contact with it.
73. In the Skies Above the Canyon: Head to the Tostarena Ruins Round Tower checkpoint and turn westward to discover some moving platforms. Walk onto the get-go platform and, just before it is nigh to drib down to the sand below, jump off to achieve the Power Moon hovering nearby.
74. Island in the Poison Swamp: Capture a Jaxi and head to location number 74 on our map. When you arrive at the poisonous substance lake you'll see a Power Moon hovering above a pocket-sized mount of sand - simply run over to it with the Jaxi to collect it.
75. An Invisible Gleam: Caput to the Moe-Eye Habitat checkpoint and capture 1 to make apply of its sunglasses ability. Walk over to the platform that raises you up onto the pillars higher up and use the Moe-Centre to walk forth the hidden path. You'll notice a hidden glowing department on meridian of the 2d colonnade - footing pound this spot to receive a Power Moon.
76. On the Eastern Colonnade: This is by far one of the hardest Power Moons to acquire in the entire game - although there is a modest play tricks to learn! Start by warping to the Tostarena Ruins Sand Pillar checkpoint and capture one of the Bullet Bills below. Wing over to the leaning tower that has a Ability Moon floating on top to the east. From at that place, turn around to watch more Bullet Bills firing towards you and, as soon every bit one manages to get around the ruins on the mainland and is heading your style, spring over to the pillar next to you lot and then that the Bullet Bill changes direction.
You'll need to capture the Bullet Pecker and wing it in an easterly direction towards location number 76 on our map. For the Bullet Bill to fly that far you'll demand to either capture it at the latest possible point - jumping off the colonnade in the direction of your goal and throwing Cappy backwards to grab it - or capture it so shake your controllers like crazy to make it heave frontwards as many times equally you lot can (something we very annoyingly overlooked the showtime time around!). When you've captured your Bullet Bill, zoom towards location number 76 equally quickly as yous can - if yous get there on fourth dimension the Bullet Nib will smash a rock which has a Power Moon inside.
77. Caught Hopping in the Desert!: At location number 77 on our map you'll find a group of rabbits. Only one of them is holding a Power Moon and then go on chasing them - using Cappy to stun them if necessary - and make contact with them to see what they are holding. Eventually (or on the commencement run if you're lucky) you'll go the Power Moon.
78. Affiche Cleanup: Behind the ruins in the northwest corner of the map you'll find a local who wants the nuptials posters removed from the building. Talk to him, so use a combination of jumps and Cappy throws to remove every last poster - the Ability Moon will then exist yours.
79. Taking Notes: Running Downwardly: Have a Jaxi to location number 79 on our map. When you arrive you'll notice a glowing treble clef - you need to bear on the treble clef and then collect every music annotation that appears. The play a trick on here is to acquire exactly where to line up your Jaxi's run to collect all the notes in time (starting from direct behind the treble clef is your best bet).
eighty. Taking Notes: In the Wall Painting: Head within the 2d Mario landscape on the Tostarena Ruins Round Tower (accessed easily by the corresponding checkpoint). You'll notice a treble clef within which will spawn several music notes - collect all of the notes before the timer runs out to collect a Power Moon.
81. Love at the Border of the Desert: A Goombette is looking for love right at the very elevation of the Kingdom (location 81 on our map). Warp to the Tostarena Ruins Entrance, capture a nearby Goomba, and begin your incredibly long journey for dear to that location. When you finally arrive you'll receive a Power Moon.
82. More Walking in the Desert!: Return to the Koopa wearing a sombrero at location 82 on our map to beginning a second walking challenge. As earlier, the trick to this Power Moon is to memorise how the runway you need to follow sits inside the scenery - have note of where the lines are in relation to nearby cacti and bushes. Perform the walk successfully plenty and you lot'll receive a Power Moon.
83. Sand Kingdom Master Loving cup: Return to the Koopa near the ruins in the northwest corner of the map to challenge him to a second race. The all-time arroyo for this race is to jump on the Jaxi who is sitting just to the left of your starting position. Ride him all the way to the goal and win to claim your prize.
84. Where the Transparent Platforms Terminate: Caput to location 84 on our map (just below the town area) to find a grayness warp pipe. Once inside, brand your mode to the end past using the nearby Moe-Eye'due south sight ability and take hold of the Power Moon that is waiting for you.
85. Jump Onto the Transparent Lift (see location 84): Inside the same room as Ability Moon 84, capture the Moe-Centre and walk onto the 2nd, longer hidden platform that can be seen with his glasses. When it almost reaches the wall on the right, y'all'll be able to drib off onto a platform right down below yous. Collect the primal that is located on this platform to unlock a Ability Moon above.
86. Colossal Ruins: Dash Leap!: Right adjacent to the Tostarena Ruins Entrance checkpoint is a greyness pipage. When inside, employ the flowers to speed your way through the room until you arrive to the Power Moon waiting for you lot at the cease.
87. Sinking Jumbo Ruins: Bustle! (run into location 86): In the same room every bit Power Moon number 86, you'll need to brand sure to collect the golden central in the more than complex part of the speedy section (located quite far down and about the cease of that wall) and still arrive back to the top. If you reach the stop on the same run as collecting the cardinal you'll be able to grab a 2d Power Moon.
88. Through the Freezing Waterway : If you caput to location number 88 on our map you'll find a greyness pipe (the quickest way to attain it is to jump off the Inverted Pyramid). Once inside, utilise the Gushens to navigate through the room - using a combination of their upwards and sideways boosts to reach the Power Moon at the end.
89. Freezing Waterway: Hidden Room (see location 88): In the aforementioned secret area as Power Moon number 88, utilise the Gushens to travel through the room until the section merely after the beginning set up of three gold rings. From here, outburst up onto the moving platform, and and then burst up and over to the left to observe a hidden department of the room. Make your style through this department to notice the Ability Moon waiting for you.
We hope that you have found this guide on collecting all Power Moons in Super Mario Odyssey's Sand Kingdom useful. Let united states of america know if you've managed to take hold of them all with a comment beneath.

Mario Odyssey Prize In The Party Room,
Source: https://www.nintendolife.com/guides/super-mario-odyssey-sand-kingdom-power-moon-locations-and-walkthrough
Posted by: greeryoullot.blogspot.com
0 Response to "Mario Odyssey Prize In The Party Room"
Post a Comment